Files and Documents


What Version of Firmware is Currently Installed?
Your firmware version can be determined by viewing the Setup System Status screen. The important value is the FW Build Number.
You can compare the Build Number with the avaiable releases below.
Do not attempt to downgrade your firmware to an older build version than the factory original. Otherwise, the NetMeter may cease working and require re-programming at the factory.
Firmware Update: Release Notes
- Current Release: V1 Build:0770 (Supports all NetMeter-3P-600 Models)
- Changes in 0770:
- Build 0770 only contains manufacturing optimizations compared to Build 0749. These changes provide no difference in the the user experience. Units shipped with Build 0770 should not be downgraded.
- Release: V1 Build:0749
- Changes in 0749:
- Fixed problem in Data Push API where certain combinations of selected data may produce incorrect data to the server (this change was introduced in Build 0746).
- Changes between Build 0746 and Build 0749 are related to manufacturing optimizations and will not affect the user experience. For devices with Build 0746, there is no advantage to upgrading to Build 0749.
- Release: V1 Build:0744
- Changes in 0744:
- A new Pmax feature has been added to the advanced datalogger. It allows peak power to be detected and datalogged.
- Several enhancements for greater robustness of the Push API that was introduced in Build:0744.
- Release: V1 Build:0736
- Changes in 0736:
- Added the data push function similar to the NetMeter-OMNI.
- Added a "Views" navigation tab that allows user defined links to be stored under the "Views" menu item.
- Added a Configuration Save/Load capability under the Setup menu (described here).
- Added some API features required for a future Analytics add-on.
- Some minor user interface enhancements were made including additional parameters for the ilog.html widget.
- Some fixes and changes to Modbus have been implemented: an average voltage register called VAVG(A+B+C) has been added (data element 40263/40264). Non-reporting sum values have been fixed. The floating line frequency value was reporting 100x the correct value and this has been fixed.
- Release: V1 Build:0673
- Changes in 0673:
- Added the "Report" tab: allows data from multiple NetMeters to be combined into a report. More information about this feature is available here.
- Changed the setup process so that the main datalogger is automatically activated when the Sensor Configuration is saved. Also, 2 "green/red LED" icons are shown on the Sensor Configuration page to confirm the status of the Main Datalogger and the Advanced Datalogger. A red LED icon indicates that the Datalogger is not enabled while a green icon indicates enabled.
- Fixed problem where ModBus value for P(A+B+C) was not calculated correctly.
- Added feature to better support Excel time format for CSV mode. When data is scaled (using the s parameter) then the time will be reported in the fixed point format used by Excel and there is no need to convert the number. The datalog.csv link in Datalog is now set up this way for convenience.
- Release: V1 Build:0655-R2
- Note about 0655-R2:
- The firmware portion of this release is exactly the same as 0655-R1, only the file system has been updated. If you already have firmware version 0655 installed, then you can skip the firmware update portion for this release and only install the file system update (this is the only file that has changed)
- Changes in 0655-R2:
- Added the ability to display a 15 min. peak demand graph (P15) for the advanced data logger.
- When plotting cumulative energy in the advanced data logger, the total energy of the viewable portion of the display is calculated and shown. It is automatically updated when the display is zoomed and panned.
- An advanced datalog widget has been added to enable real-time updated graphs to be embedded in HTML iframes.
- See Build:0655-R1 for a description of firmware changes
- Release: V1 Build:0655-R1
- Changes in 0655:
- Added feature in Details page to show possible CT phase errors to assist in NetMeter installation
- Added capability for custom HTML pages (found under SetupLan/Network Configuration)
- NTP stack activity has been removed as it is not required (reduces false positives by firewalls)
- "Show Data Clearing Options" in the Sensor Configuration page is now operational
- Fixed possible divide-by-zero error in the sdata.json query when scaled data is requested
- Changes in 0632:
- Modbus reporting of cumulative energy sums (A+B+C) has been fixed
- Global voltage multiplier now displays correctly in the sensor configuration page
- More options in the sensor configuration page for red/yellow annotations
- Changes since Build 0465:
- Support for 16MB flash memory. All NetMeters shipped since December 2012 have 16MB flash memory. Customers may return their 4MB NetMeters for a free upgrade to 16MB. Contact Z3 Controls for details.
- First release of ModBus TCP support
- Improved Datalog download times and datalog plotting capabilities
Firmware Update: Installation Instructions
Firmware updates consist of 2 files:
- The Firmware update: updates the processors operating system
- The File System update: updates the contents of the web pages inside the NetMeter
Both files must be uploaded to complete an update.
Important Note: the process of performing a firmware update may erase data in the Advanced Datalogger. The Main Datalogger will not be affected. If you need to retain the data in the Advanced Datalogger, it can be downloaded to a file in both JSON and CSV formats as described here.
Data in the Advanced Datalogger will not be erased under the following conditions:
- Current firmware is Build 0734 or higher and
- System memory is 16MB or larger
This information can be determined by viewing the SetupSystem Status screen.
Installation Steps
- Download the firmware zip archive (above)
- Extract the files from the archive
- Install the Firmware file (the file with the ".z3x" extension)
- From the NetMeter web interface navigation bar, click Setup then Firmware Update under the "Setup Options" menu and the following screen will appear.
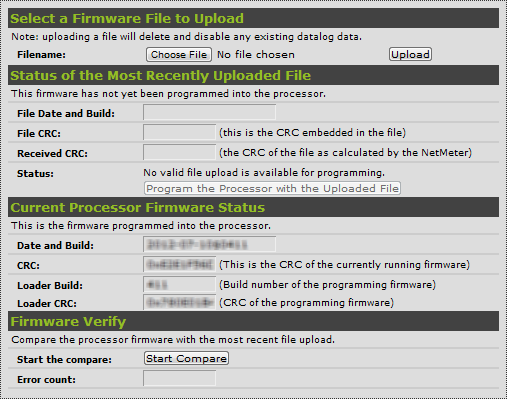
- Select "Choose File" and select the file from the zip archive with the ".z3x" extension. Then press the "Upload" button. If the file is correct, it will upload (takes about 60 seconds) and the screen will refresh to show relevant information in the section "Status of the Most Recently Uploaded File"
- If the uploaded file is legitimate (has the correct CRC etc.) then the button "Program the Processor with the Uploaded File" will become enabled.
- Before going any further, make sure that your NetMeter has stable power, preferably from a battery backed up UPS. Programming only lasts for about 15 seconds: do not interrupt NetMeter Power during this time.
WARNING: loss of NetMeter power during programming can render it inoperable!
- When you are confident that NetMeter power is stable, then click "Program the Processor with the Uploaded File" and confirm the pop-up button that follows.
- During programming, the green heartbeat LED (which normally flashes once every second) with flash quickly. Wait until it finishes flashing quickly and begins to flash at a 1 second interval again.
- When the 1 second heartbeat flash rate is reestablished, programming is complete. Refresh the browser screen and the new firmware should be shown in the "Current Processor Firmware Status".
- From the NetMeter web interface navigation bar, click Setup then Firmware Update under the "Setup Options" menu and the following screen will appear.
- Install the File System file (the file with the ".bin" extension)
- From the NetMeter web interface navigation bar, click Setup then File System Update under the "Setup Options"
- Select "Choose File" and select the file from the zip archive with the ".bin" extension. Then press the "Upload" button. If the file is correct, it will upload and the screen will refresh and show a link to the main page.
- At this point, the update process is complete. However, you may experience odd behavior of the NetMeter web interface due to caching of web content. It is recommended to clear your browser cache contents or hit the "refresh" button on your browser a couple of times to force a reload.
Z3 Device Discoverer
The Z3 Device Discoverer is a program that runs on a Windows PC. It is used to scan for Z3 Controls devices on your local network. It can be used to locate NetMeters on your network if you are having a problems finding them on the network.
Installation Instructions
- Download and unzip the Z3 Device Discoverer zip file (available at top of page).
- The unzipped folder should contain a "setup.exe" file: double click/open this.
- A security warning may appear: Select "Install" to proceed with the installation. Also, do not allow firewall software to block any network ports in use by the Device Discoverer software.

- A start icon for the Device Discoverer software will be installed under "Z3 Controls Inc" and the program can be run from there.
Using the Z3 Device Discoverer
Run the Z3 Device Discoverer.
You may have to configure your computer's firewall to prevent it from blocking UDP port 30303.
If a firewall warning message occurs, click the "allow" button.
The Z3 Device Discoverer program broadcasts a special request packet that all TCP/IP based devices from Z3 will respond to. The response packets are captured by the software and displayed:
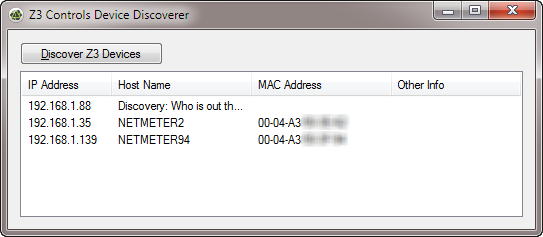
IP Address
- This is the IP address device. The "Discovery" device is the computer running the software.
- Clicking on one of the IP addresses will launch a web browser and display the home page of the device.
Host Name
- This is the NetBIOS host name of the Z3 Device. For client devices that implement NetBIOS, this host name may be used to locate the device. For example: http://netmeter2 can be used in a web browser (web links are not case sensitive)
MAC Address
- This is the Ethernet Media Access Controller (MAC) address that is hard wired into the Z3 Controls module. It is also the serial number for the device.
While running, the software is always scanning for new Z3 devices to announce themselves on the network, this happens automatically whenever a Z3 device is added to the network or is reset/power cycled.
Use the Device Discoverer to keep track of devices on your local area network. It is especially useful for troubleshooting.