Files and Documents
| Product Briefs | ||||
|---|---|---|---|---|
| Title | Type | Size | Date | Note |
| NetMeter-OMNI-8C Product Brief |  |
2.4MB | 2014-02-02 | |
| User Manuals | ||||
| Title | Type | Size | Date | Note |
| NetMeter-OMNI-8C Installation Manual | |
3.4MB | 2014-02-19 | |
| NetMeter-OMNI-8C Modbus Manual | |
263.7KB | 2013-12-02 | |
| User Guides | ||||
| Title | Type | Size | Date | Note |
| NetMeter-OMNI NEMA1 10"x10" QuickGuide | |
2.7MB | 2014-09-24 | |
| Online Help for the NetMeter-OMNI |  |
- | - | |
| NetMeter-OMNI API Specification 1.0.0 | |
1023.9KB | 2014-03-22 | TLA |
| NetMeter-OMNI Data Push API Guide 1.0.3 | |
1.1MB | 2014-12-16 | TLA |
| Downloads/Firmware | ||||
| Title | Type | Size | Date | Note |
| NetMeter-OMNI Firmware Update: Notes and Instructions | |
- | - | |
| NetMeter-OMNI Firmware Update (V1 Build:0459) |  |
638.5KB | 2016-04-06 | TLA |
| NetMeter-OMNI Firmware Update (V1 Build:0405) | |
638KB | 2014-08-29 | TLA |
| Z3 Device Discoverer 1.00 | |
207.3KB | 2012-08-14 | TLA |
| Z3 Device Discoverer Installation Instructions | |
- | - | |
| Online Tools | ||||
| Title | Type | Size | Date | Note |
| Online Datalog Viewer (view a previously saved JSON file) | |
- | - | |
Firmware Update: Release Notes
- Current Release: V1 Build:0459 (Supports all NetMeter-OMNI Models)
- Changes since 0452
- User interface enhancements including updated datalog plotter and improved datalog widget.
- Added 15 minute interval option for the datalog.
- Single click option to use the MAC/Serial number as the API key for the Data Push Configuration
- Fixed possible overflow causing data corruption when large custom HTML is saved inside the NetMeter
- More robust communications for the Data Push API
- Release: V1 Build:0452 (Supports all NetMeter-OMNI Models)
- Changes since 0413
- Modbus Master mode added: allows the NetMeter-OMNI to poll and datalog modbus registers of external modbus devices.
- Some user interface and widget improvments have been added.
- Release: V1 Build:0413 (Supports all NetMeter-OMNI Models)
- Changes since the original release of Build:0413 (New as of 2015-02-03)
- A small change in the file system was implemented to work around a bug in Firefox V35.0 that could cause some web pages to not load properly. If you installed Build:0413 firmware prior to 2015-02-03, this file system update is recommended.
- Changes since 0405:
- Data clearing operations under Setup
 Save/Load Configuration are now fully functional.
 - New timeclock battery replacement proceedure has been added under SetupSave/Load Configuration
- Release: V1 Build:0405 (Supports all NetMeter-OMNI Models)
- Changes since 0283:
- Various user interface improvements have been made.
- The Views tab has been added to allow user defined views to be recalled from the main navigation bar. The user defined views may be configured in the SetupDefine User Views page.
- Graphical improvements have been made to the data plotting widget including the ability to set the plot range rather than rely on the autoscale feature. See the Widgets help page for more information.
- A new sensor input mode has been added. Now, in addition to the "Current(0-20mA)" mode there is also a "Current(4-20mA)" mode. In "Current(4-20mA)" mode, input current levels below 4mA will be reported as 4mA. Thus, a disconnected sensor will not show an unexpected out-of-range value. Note that the datalogger inside the NetMeter-OMNI records the actual current down to 0mA. It is only the readback of data from the Datalog that will be limited to a 4mA minimum value.
- A new firmware update feature has been added. It allows direct download from z3controls.com instead of requiring the user to download a ZIP file that contains the 2 files needed for each update. The previous firmware update method continues to be supported and will need to be used when there is no internet connectivity. However, future firmware updates can be accomplished more easily when there is internet connectivity.
- Data push API has been added. Allows the NetMeter OMNI to synchronize the internal datalogger with a server.
- Fixed bug that causes pulse counter data in the datalog to be improperly reported when the number of accumulated pulses exceeds 2147483647. The problem was in reporting only so all previously recorded data is unaffected and will be properly reported after installing build 405.
- Release: V1 Build:0283 (Supports all NetMeter-OMNI Models)
- Changes in 0283:
- Improvements in the user interface.
- API now fully implemented.
- Fixed several bugs in the data query API.
Firmware Update: Installation Instructions (Online Mode) NEW!
Firmware updates are more easily accomplished when the NetMeter-OMNI and your computer is on a network that is connected to the Internet. This is the proceedure:
- Using Chrome, navigate to SetupFirmware Update. When properly connected, the screen looks similar to below with the section "Load Firmware from the Z3 Controls Website":
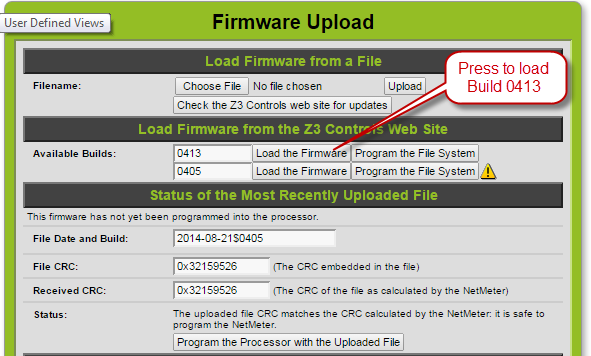
If "Load Firmware from the Z3 Controls Website" is not visible it is because you are unable to communicate with the Z3 Controls web site - Press the button Load the Firmware next to the build number for the upgrade that is to be loaded. In the above example this would be build number 0413. That will cause the file to be transferred from z3controls.com to a temporary storage location in the NetMeter-OMNI. The following progress window will appear:

Once the new firmware has been uploaded into the NetMeter-OMNI's temporary storage (takes about 1 minute) the screen will reload and the uploaded build number should appear under "Status of the Most Recently Uploaded File".
- The upload must be programmed into the processor. Before going any further, make sure that your NetMeter-OMNI has stable power, preferably from a battery backed up UPS. Programming only lasts for about 15 seconds: do not interrupt NetMeter-OMNI Power during this time.
WARNING: loss of NetMeter-OMNI power during programming can render it inoperable!Programming is done by pressing Program the Processor with the Uploaded File and press "Ok" to confirm the operation:

During programming, the green heartbeat LED (which normally flashes once every second) with flash quickly. Wait until it finishes flashing quickly and begins to flash at a 1 second interval again. When the 1 second heartbeat flash rate is reestablished, programming is complete and the NetMeter-OMNI will reboot. Refresh the browser screen and the new firmware should be shown in the "Current Processor Firmware Status". - The final step is to program the file system. This is done by pressing the button Program the File System adjacent to the corresponding build number and press "Ok" to confirm the operation:

The file system update progress will be displayed:

Once the screen refreshes, the update process is complete. However, you may experience odd behavior of the NetMeter-OMNI web interface due to caching of old web content by your browser. It is recommended to clear your browser cache contents or hit the "refresh" button on your browser a couple of times to force a reload.
Firmware Update: Installation Instructions (Offline Mode)
Firmware updates consist of 2 files:
- The Firmware update: updates the processors operating system
- The File System update: updates the contents of the web pages inside the NetMeter-OMNI
Both files must be uploaded to complete an update.
Installation Steps
- Download the firmware zip archive (above)
- Extract the files from the archive
- Install the Firmware file (the file with the ".z3x" extension)
- From the NetMeter-OMNI web interface navigation bar, click Setup then Firmware Update under the "Setup Options" menu and the following screen will appear.
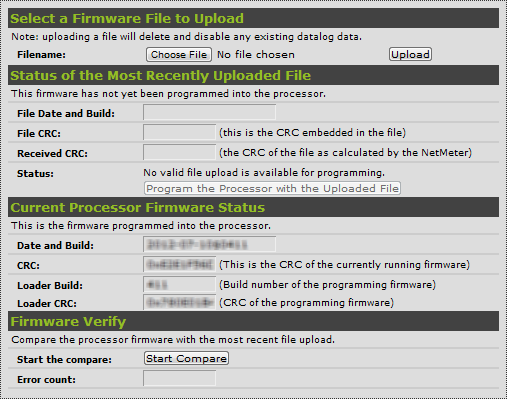
- Select "Choose File" and select the file from the zip archive with the ".z3x" extension. Then press the "Upload" button. If the file is correct, it will upload and the screen will refresh to show relevant information in the section "Status of the Most Recently Uploaded File"
- If the uploaded file is legitimate (has the correct CRC etc.) then the button "Program the Processor with the Uploaded File" will become enabled.
- Before going any further, make sure that your NetMeter-OMNI has stable power, preferably from a battery backed up UPS. Programming only lasts for about 15 seconds: do not interrupt NetMeter-OMNI Power during this time.
WARNING: loss of NetMeter-OMNI power during programming can render it inoperable!
- When you are confident that NetMeter-OMNI power is stable, then click "Program the Processor with the Uploaded File" and confirm the pop-up button that follows.
- During programming, the green heartbeat LED (which normally flashes once every second) with flash quickly. Wait until it finishes flashing quickly and begins to flash at a 1 second interval again.
- When the 1 second heartbeat flash rate is reestablished, programming is complete. Refresh the browser screen and the new firmware should be shown in the "Current Processor Firmware Status".
- From the NetMeter-OMNI web interface navigation bar, click Setup then Firmware Update under the "Setup Options" menu and the following screen will appear.
- Install the File System file (the file with the ".bin" extension)
- From the NetMeter-OMNI web interface navigation bar, click Setup then File System Update under the "Setup Options"
- Select "Choose File" and select the file from the zip archive with the ".bin" extension. Then press the "Upload" button. If the file is correct, it will upload and the screen will refresh and show a link to the main page.
- At this point, the update process is complete. However, you may experience odd behavior of the NetMeter-OMNI web interface due to caching of web content. It is recommended to clear your browser cache contents or hit the "refresh" button on your browser a couple of times to force a reload.
Z3 Device Discoverer
The Z3 Device Discoverer is a program that runs on a Windows PC. It is used to scan for Z3 Controls devices on your local network. It can be used to locate any type of NetMeter (or other Z3 Products) on your network if you are having a problems finding them on the network.
Installation Instructions
- Download and unzip the Z3 Device Discoverer zip file (available at top of page).
- The unzipped folder should contain a "setup.exe" file: double click/open this.
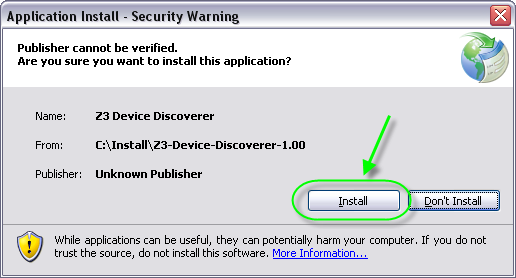
- A security warning may appear: Select "Install" to proceed with the installation. Also, do not allow firewall software to block any network ports in use by the Device Discoverer software.
- A start icon for the Device Discoverer software will be installed under "Z3 Controls Inc" and the program can be run from there.
Using the Z3 Device Discoverer
Run the Z3 Device Discoverer.
You may have to configure your computer's firewall to prevent it from blocking UDP port 30303.
If a firewall warning message occurs, click the "allow" button.
The Z3 Device Discoverer program broadcasts a special request packet that all TCP/IP based devices from Z3 will respond to. The response packets are captured by the software and displayed:
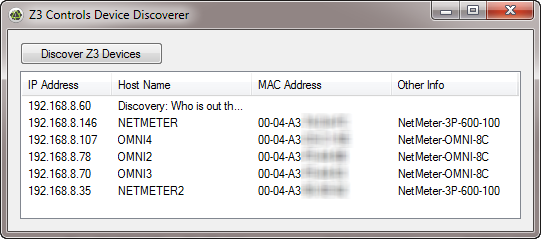
IP Address
- This is the IP address device. The "Discovery" device is the computer running the software.
- Clicking on one of the IP addresses will launch a web browser and display the home page of the device.
Host Name
- This is the NetBIOS host name of the Z3 Device. For client devices that implement NetBIOS, this host name may be used to locate the device. For example: http://omni4 can be used in a web browser (web links are not case sensitive)
MAC Address
- This is the Ethernet Media Access Controller (MAC) address that is hard wired into the Z3 Controls module. It is also the serial number for the device.
While running, the software is always scanning for new Z3 devices to announce themselves on the network, this happens automatically whenever a Z3 device is added to the network or is reset/power cycled.
Use the Device Discoverer to keep track of devices on your local area network. It is especially useful for troubleshooting.